

With the free Picasa app from Google, users of both Mac and Windows can easily organize and view their photos. Even though Google Photos has superseded Picasa, many people still use Picasa 3, the previous version.
An often-asked question among Picasa users, this article will show you how to remove duplicate images from Picasa. Everything you need to know about duplicate photos in Picasa is right here.
What Causes Picasa to Store Duplicate Images?
Picasa allows you to view images on your computer but cannot copy them. Picasa can display duplicate images if you have them on your computer. Select “Exclude Duplicates” during the import process to sidestep this problem. Additional probable causes of duplicate photos in Picasa include the following:
● Multiple Folders: Because most people use various folders for different purposes, there will always be some duplicates.
● Image Transfer: Avoid accidentally storing duplicate photos on your computer by erasing them after copying them from your digital camera to your hard drive.
● Various Cloud-based Platforms: Numerous cloud services, like iCloud and Google Photos, increase the likelihood of duplicates.
● Bugs and Glitches: It is also possible for glitches and bugs to cause your Google Drive to contain duplicate photos.
To aid in the detection and deletion of duplicate photos, Picasa offers an experimental tool known as Show Duplicate Files. Another option for starting over with a fresh database is reinstalling the software.
3 Different Ways to Eliminate Duplicate Images Manually
In this article, we will discuss how to remove duplicate images in Picasa. Now and then, users will notice that Picasa has several versions of their photos which is quite troublesome. Some adjustments and the methods described in this article are required to clean up that mess.
Many users are transferring their photo collections to Google Drive in preparation for Picasa’s support end. The methods to delete multiple photos in Picasa are as follows.
Method 1: Change Preferences for the Program
Picasa will check for duplicates when you import photos from your computer or the web. To make the changes shown below, go to the program’s preferences:
Step 1: Choose Tools > Options
Step 2: Select “General” from the pop-up menu
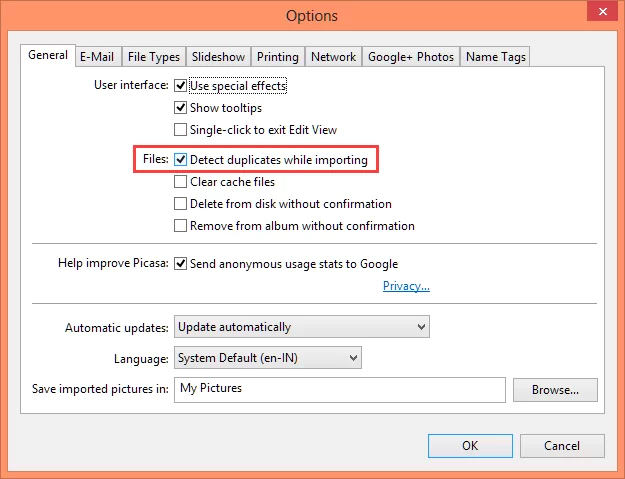
Step 3: Then you must select “Detect duplicates while importing” and click the “OK” button.
Step 4: Tap the OK button
Method 2: With the Help of Picasa Duplicate Finder
Picasa has a function that can find and delete duplicates automatically. The procedure is as follows:
With Windows 8.1, 8, 7, and Vista:
Step 1: To open Picasa, double-click its desktop icon.
Step 2: To view duplicate files, go to the Tools menu and choose Experimental.
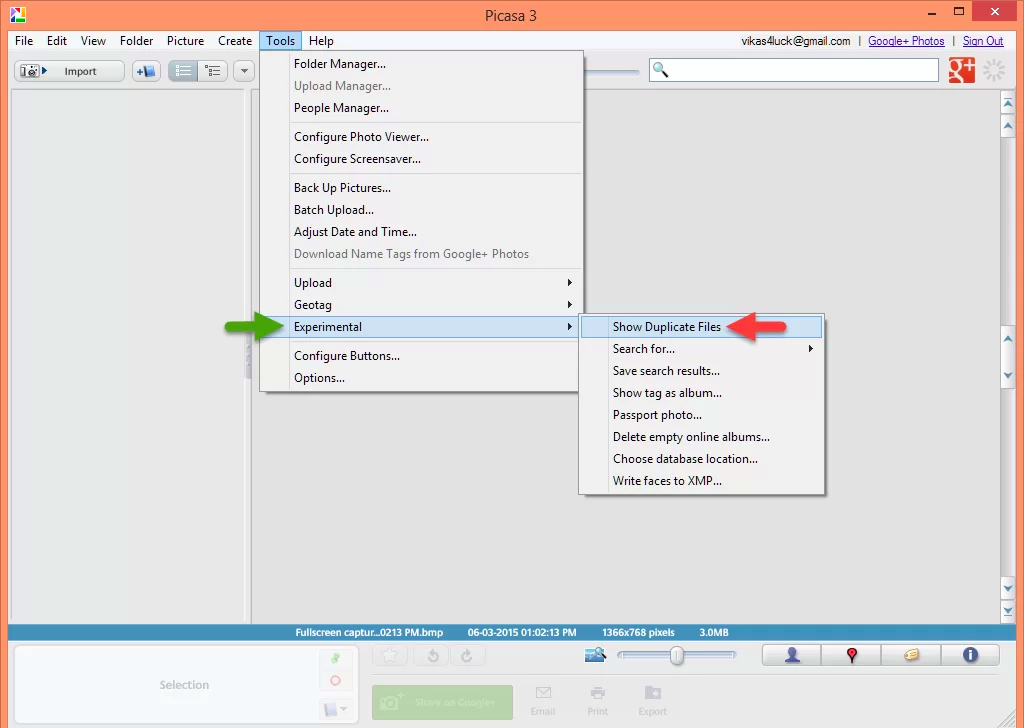
Step 3: Picasa will automatically display identical or similar photos regardless of whether the intended recipients’ locations are identical or distinct.
Step 4: To make a copy of an image, right-click on it and choose “Delete from Disk” or use the “Ctrl + Delete” keyboard shortcut. Choose “Locate on Disk” to access the folder it contains.
You should be aware that this process is time-consuming and monotonous. You can remove duplicate images from your computer as easily as using an automated tool.
Method 3: Reconstruct the Data Store
You don’t need to specify a directory for Picasa to save your images. Contrarily, it adds information about your images to its database after scanning specific locations of your hard drive (such as My Pictures or Downloads).
To help you keep track of all your pictures, Picasa generates a database file that includes information like file names, directories, any unsaved changes, and more.
Existing database duplicate file entries may need updating. Reinstalling the program creates a new database. Only the program installation folder is safe for saving files. It assumes you organize photos in Picasa from Downloads, My Pictures, etc.
In the case of Windows 8.1 and 8:
Step 1: Hit Windows Key + X, then choose Programs and Features.
Step 2: You now have a complete inventory of all programs.
Step 3: Choose the “Uninstall” option when you right-click Picasa.
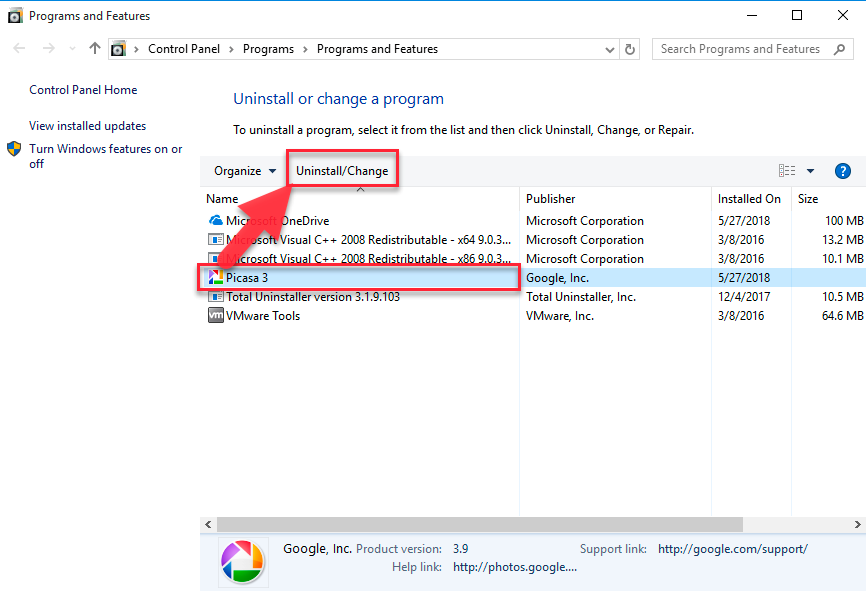
Step 4: After you’ve followed the removal instructions, restart your computer.
Step 5: Go to the Picasa Download Page, get the most recent version, and install it.
Step 6: To re-index your files, it comes with a wizard that walks you through each step.
Windows 7 and Vista users:
Step 1: Move your cursor to the Start button located on the taskbar.
Step 2: Press the Enter key after typing “Uninstall a program” into the search bar.
Step 3: You now have a complete inventory of all programs.
Step 4: Choose the “Uninstall” option when you right-click Picasa.
Step 5: After you’ve followed the removal instructions, restart your computer.
Step 6: Go to the Picasa Download Page, get the most recent version, and install it.
To re-index your files, it comes with a wizard that walks you through each step.
Conclusion
For frequent Picasa photo importers, trying to find and delete duplicates can save the day. However, duplicate photos can occur for many reasons. Picasa will display them once in your libraries and folders, making photo management and viewing harder.
Picasa’s duplicate-image-finding tool rarely works. Picasa duplicate finder saves the day. Understanding Picasa, regardless of tool, helps you handle duplicates more easily and reliably. Hopefully, you will know how to remove duplicate images in Picasa.
