

Screen recording is a useful feature that allows you to capture your screen activity and save it as a video file. It can be helpful for creating tutorials, demos, or simply recording your gameplay.
In this guide, we’ll show you how to screen record on Windows with 3 different tools. While there are a lot of screen recorders for Windows 10, we are here to give you the best.
There are manual methods on how to screen record in Windows 10 or Windows 11. The easiest ones are by using the built-in Xbox Game Bar or using the Snipping Tool. Alternatively, you can use one of the best screen recorders for Windows in 2023.
Method 1: Use the Xbox Game Bar to Screen Record in Windows 10 or Windows 11
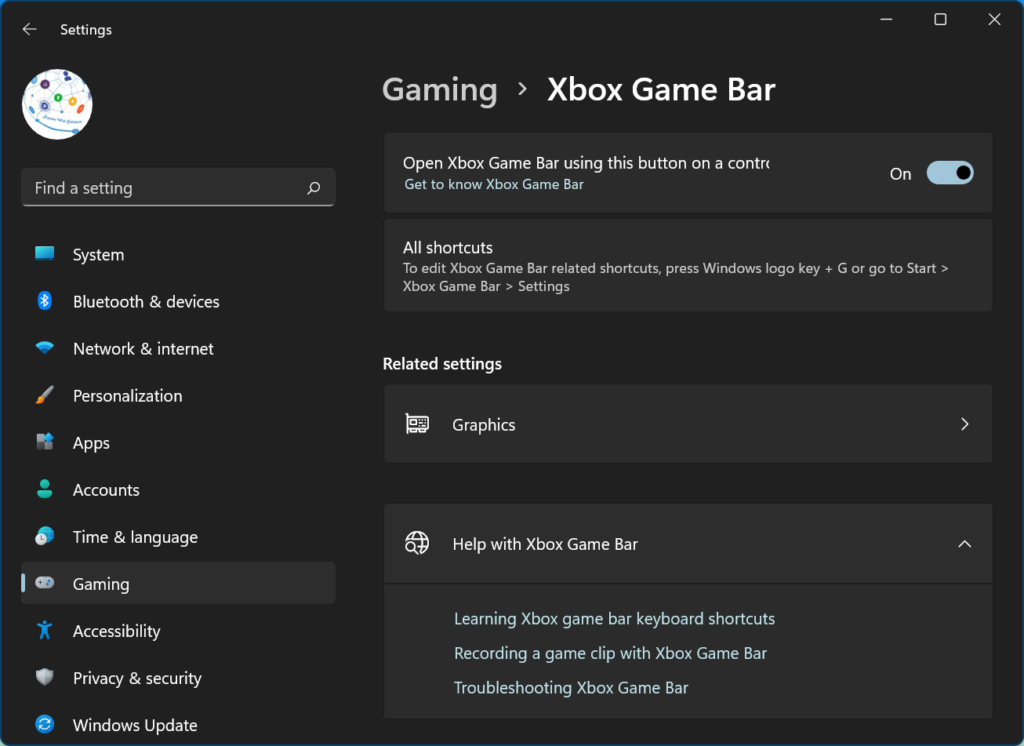
Screen Record on Windows with the Xbox Game Bar is easy. You first need to ensure that the utility is enabled in the Windows settings. You can press Win + I to access Settings and click on the Gaming tab in the left panel. Click on the Xbox Game Bar and toggle ON the Game Bar.
How to Use this Method Manually?
Step 1: Open the app or window that you want to record.
Step 2: Press Windows + Alt + G to open the Xbox Game Bar.
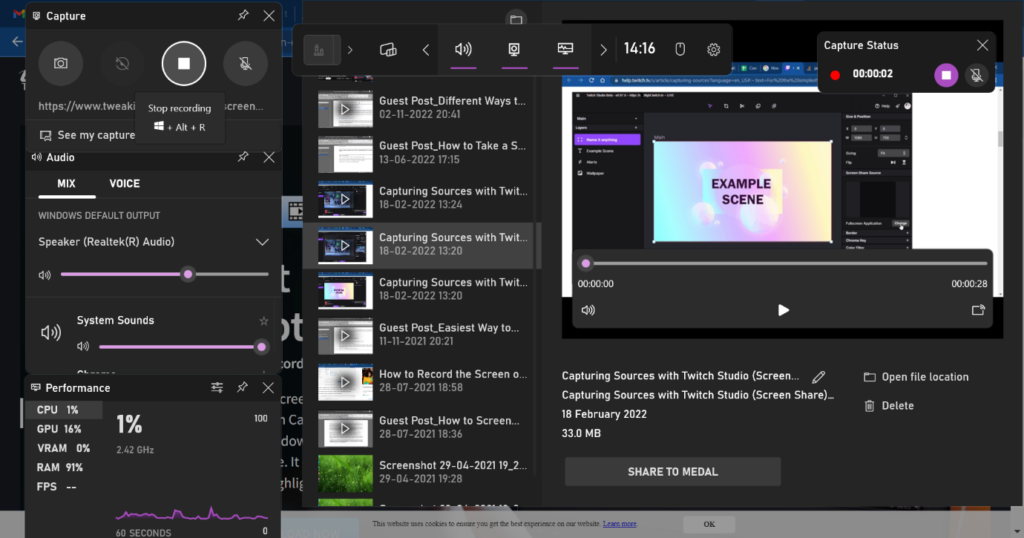
Step 3: Click the Capture button (the red circle icon) to start recording.
Step 4: To stop recording, press Windows + Alt + R or click the Capture button again.
Method 2: Screen Record Using the Snipping Tool
The Snipping Tool is a built-in Windows tool that can be used to take screenshots and screen recordings. It is a simple and easy-to-use tool, but it does not offer as many features as some third-party screen recording tools.
How to Use this Method Manually?
Step 1: Open the app or window you want to record.
Step 2: Search for and open the Snipping Tool from the Start menu.
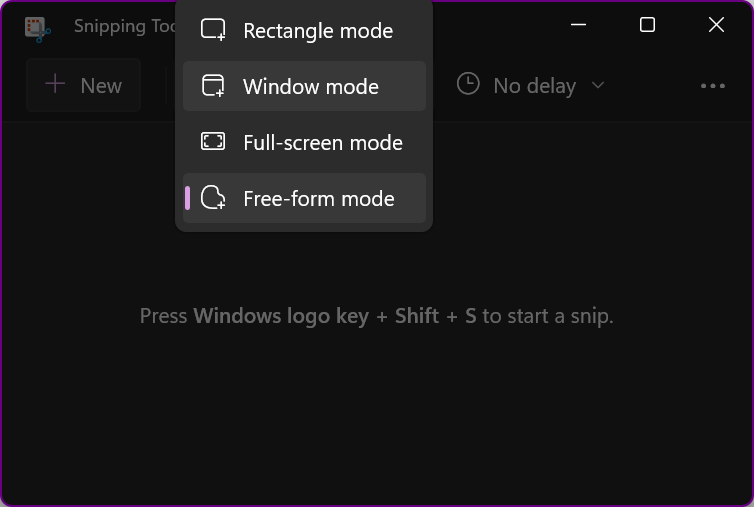
Step 3: Click the Mode dropdown menu and select Recorder.
Step 4: Click New to start recording.
Step 5: Draw a rectangle around the portion of the screen you want to record.
Step 6: Click Start to begin recording.
Step 7: When you’re done with the recording, click Stop.
Method 3: Using Third-party Software
There are also many third-party screen recording programs available, such as OBS Studio, Screencast-O-Matic, and Snagit. These programs typically offer more features and customization options than Windows’s built-in screen recording tools. To screen record, with third-party software, simply follow the instructions provided by the program’s developer.
We have tested, compared, and listed the best screen recorder for Windows in 2023. It’s a lightweight utility that comes with multiple editing options and comes with advanced filters to customize the capture.
Advanced Screen Recorder by Systweak
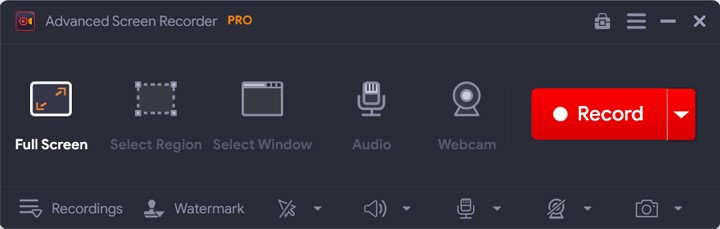
Those who are eager to record important webinars, gameplay, etc., can make the most out of this amazing tool. Advanced Screen Recorder by Systweak is considered the best software for screen recording and editing screenshots. It has a user-friendly interface that has all the options right in front of you. You can quickly capture screenshots, and screen record webcam feeds, webinars, screen activity, and other videos from OTT platforms. You can edit videos and personalize them with a watermark.
Features
- Live stream video can also be conducted.
- You can use this software for better screen recording.
- From scheduling to annotation video recording everything can be perfectly done.
- HD-quality video recording is possible.
Pros
- Rather than other software, it’s quite cheap.
- It’s one of the simplest software for screen recording.
- From automatic splitting to automatic stop, all are accessible here.
- One can trim video with this software.
Cons
- It’s available for Windows only.
How to Use Advanced Screen Recorder?
If you want to record a screen with Advanced Screen Recorder you need to follow the steps given below:
Step 1: First, you need to download and install the Advanced Screen Recorder.
Step 2: Then, you need to launch the screen recording software.
Step 3: You will find a tutorial screen, that you may either follow or skip.
Step 4: Then, you need to choose from the recording options.
Step 5: You need to click the speaker icon and choose the audio input to record audio. If you want to record a voice-over you need to click the Microphone icon.
![]()
Step 6: Then, you need to tap the Record button to begin recording. You will receive a mini toolbar with pause, stop, and timer as soon as the screen recording begins.
Step 7: You need to click the Red Square button to save the recording.
Step 8: Click the Recordings tab to view the recording.
FAQs Best Screen Recorder
1. What is Screen Recording Software?
Screen recording software is a sort of utility that permits you to capture and record the activity on your PC. It’s majorly used to capture tutorials, webinars, PPT, gameplay, conference calls, and more.
2. What are the Best Popular Screen Recording Software?
We have tried, tested, reviewed, compared and listed some of the famous screen recording software for Windows PCs. The best ones include OBS Studio, Camtasia, Snagit, Bandicam, ScreenFlow (for MacOS), ShareX, and Windows 11 and above versions with Xbox Game Bar.
3. How Would I Pick the Best Screen Recording Software for PC?
You may consider using it for Windows, macOS, or Linux operating systems to record gameplay, webcam recording, and other screen activities. You can record speaker sound, mic, and other input devices while working with your favorite videos.
4. Is Screen Recording Software FREE or Paid?
Screen recording software is available for free and paid subscriptions. The FREE version may not offer all the premium capabilities however the paid version can unlock dozens of advanced apps and utilities.
5. Can I Record Sound Along with the Screen Recording?
Most screen recording software allows you to capture Fullscreen sound and speaker sound at the same time. You can always change the sound settings to suit your requirements.
6. Could I at Any Point Keep in Superior Quality (HD) or 4K?
Most of the Screen Recording Software can record premium quality videos in Ultra-HD or 4K resolution. Make sure to configure the PC settings before using it.
7. Are there Screen Recording Software Available for Smartphones?
There are Screen Recording Software accessible for both Android and iOS devices. A few of the gadgets likewise have similar screen recording highlights.
8. Alter the Screen Window?
Screen recording software allows you to alter the screen recording window. You can cut crop and customize the screen recording right from the console. Advanced Screen Recorder allows you to customize your screen recording.
Conclusion
This article on how to screen record on Windows has both manual methods and an automated utility to record screens on Windows 11 and earlier versions. Windows 10 and 11 come with an inbuilt utility to screen record, capture, screenshots, and make small edits. If you want to record professional videos, you can use the best screen recorder for Windows. Advanced Screen Recorder can help you record, capture, edit, and personalize videos on your Windows PC.
