

The UX design is a pivotal part of any successful web application. It ensures that the users find exactly what they need without weeding through the page. User satisfaction can lead to repeat visits and more leads and sales. A great UX design can also lead to more user engagement and longer session durations on your site. The longer users stay on your site, the more likely it is that Google will interpret value in your site, helping boost your SEO.
Better design of your web application shows users the value you place in your business, since you took the time to design it to perfection. This establishes you as a professional and a thought leader in your space, leading to better sales and leads.
What Users Look For In A UX Design
Even though users don’t actively visit your website for the improved UX design, the experience it offers could change the outcome of their interaction with your business. To achieve a great UX design, it is essential to remember first to keep the visual balance simple. Less is more.
Your users need to be able to navigate the application with ease. Make sure that your application or site is consistent and straightforward with no fluff. Make sure that the communication is simple and concise. Be contextual to ensure your users know exactly what your company is about and what you do.
Steps To Convert Your Design Into Code To Improve UX Design
The first step in creating the perfect UX design is identifying users’ problems. Every industry has specific needs, and conducting research to identify these pain points is vital. It is often essential to use data you have collected to ensure that you address problems within your user base. A great way to collect this data is by conducting surveys and interviews.
Ask your users:
- What would you like to see on the site or app?
- What elements do you look for and use when browsing a site online?
- What issues, if any, have you encountered while using our site or app?
- What issues, if any, have you encountered while using our competitor’s sites or apps?
Documentation
Once you have collected enough data about user pain points, it is time to document your findings and the initial ideas you had to improve the setup. Identify design components, such as where to place buttons, forms, and the navigation bar. Prioritize the most important elements and identify where best to place them in relation to what they do. Make sure they are placed in such a way that makes interactions between features easier.
Select the platform you want the application to run on. Is it an Android or an iOS application, or are you building a website? Next, identify the code language and coding platform. Will you be using JavaScript, CSS, or HTML?
A flow chart is one of the best ways to document your app or web tool process. This way, you can easily see what aspects connect and affect one another. As a web developer, flowchart is also a great way to showcase your thought process to your clients before commencing with a project.
Style guide
Often, crafting the style guide is included in the documentation process. However, it deserves its own step on this list due to its importance. The style guide helps create brand uniformity in colors, font, and general design. This establishes a structural consistency across the various content you want to bring to life. The style guide is meant to showcase the company’s personality and values. It also helps the DEV team make adjustments while sticking to your guide’s specifications.
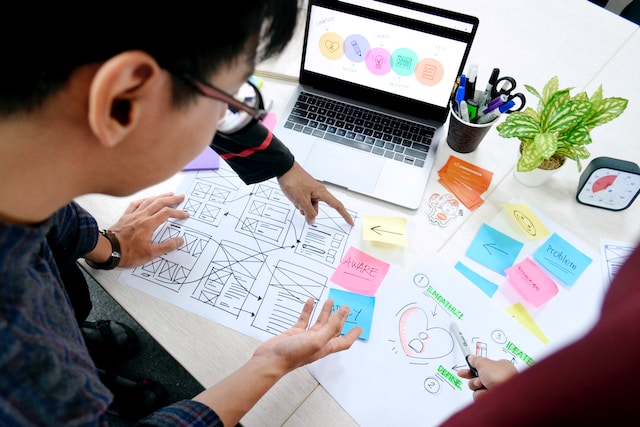
Wireframe And Mapping Your User Journey: Imaging
Mapping out the user journey is an integral step, especially if you want to show your DEV team exactly how corresponding elements interact. Wireframing shows your clients a visual representation of the final product. Coupled with the relevant documentation, this information can help your DEV team offer valuable input before beginning the designs. If you are designing the application yourself, wireframing is also a great way to ensure you keep the final product in mind throughout the process.
Imaging can range from simple concepts like pencil drawings to more complex illustrations from Sketch, Adobe XD, and Canva.
At this stage, use these illustration tools to visually represent the different application elements as you would want them to appear. Place them at the exact points you would like them displayed in the final product.
Component Breakdown
As mentioned before, mapping the user journey helps with identifying where to place the different elements. A component breakdown will help you prioritize these elements using a clear visual representation. This will help you streamline your sitemap to identify how these elements will interact with each other. By identifying and working on each component individually, you can systematically optimize user experience at every juncture.
Prototype
Now that you have a clear picture and understanding of each element, it is time to move the process to an interactive setup and create a prototype. The prototype can be considered as the first draft of your site or application. Therefore, it may look less polished than your final draft. In this step, you will include functional elements and incorporate the color scheme and fonts to mirror the final product.
Unlike wireframing, which is more about visual representation, the prototype is about user experience. Consider whether the alignment of the different elements improves or hinders navigating around the web application.
Use your documentation and add notes to the prototype explaining how your decisions affected the interactions. Are the buttons visible and functioning with different-sized screens?
Some tools you can use include Adobe XD, Figma, and Sketch.
Once all this information is included, you can share it with stakeholders or your DEV team to begin the design process, depending on the direction you want to take from this point. These steps ensure that you have sufficient UX design considerations before building your web application. It is often easier to fix the design and layout in these early stages to reduce cost and time. Following these steps also ensures that the building process of any web application is easier, affordable, and systematically optimized.
